A Digital Minimalist's Guide To Dumbing Down The iPhone
This time however, my aim was to retain the full access to information and connectivity that smartphones are essential for, but without the addictive stimulation. The idea here is to keep all the utility that makes the iPhone amazing but keep yourself in the driver seat.

Decaf Journal is reader-supported. When you buy links through our site, we may earn an affiliate commission.
The next time that you're out and about, let's say at a coffee shop or taking public transit, have a look around you and take note of how many people are mindlessly staring at their phones. Would you say it's 90% of people? Maybe even one hundred percent?
Smartphone addiction has become such a deeply ingrained epidemic in our society that even the most fervent techno-optimist would have a difficult time refuting its severity. I say this with confidence because as I just alluded to, you can plainly observe the evidence all around you, quite literally all of the time.
If it feels like you’re constantly fighting against this incredibly useful technology, well, that's because you are. These captivating apps, intoxicating social media algorithms, and sleek devices have all been deliberately crafted from the ground up by some of the smartest people on earth with the primary objective being to hijack your attention indefinitely. But as you've likely noticed by now, our brains simply weren't designed to sustain the endless drip of cheap dopamine that this resulting digital dependency entails.
I was a late adopter to smartphones back when they were fast becoming the dominant form of communication in the early 2010s. During this time, I would often watch in dismay as others were helplessly glued to their phones at restaurants, how they would hardly interact with their significant other or friends who were sitting directly across from them. It was glaringly obvious to me at the time just how distracting it was and I felt dignified for holding a defiant position on the matter. But as smartphones became more ubiquitous in society, I too eventually relented.
Within a couple of years I really began to notice that my ability to focus had become increasingly dull and my attention span was rapidly veering off a cliff. The constant notifications from my phone apps, likes, comments, and lack of boredom (there's always something to watch) was preventing me from being able to enter a flow state of work, and my creativity suffered as a result. I suspect this is why famed Hollywood director Christopher Nolan has wisely chosen not to own a smartphone, though the problem with this approach for regular folks like you and I is that these devices are now so deeply embedded in our society that we're quickly reduced to second class citizens without them.
I can attest to this because for three years (2016-2019) I chose to life life without a smartphone, instead opting for the ultra minimalist Punkt MP01 and later the "dumb" Nokia 3210 once the former's micro USB port would no longer charge the battery. Though the experience was initially quite freeing, I missed the usefulness of banking apps, Google Maps, was constantly fighting with online services forcing two factor authentication and QR codes, and international travel was often a nightmare.

Since going back to the Apple iPhone a couple years ago, the same concentration issues that once plagued me have slowly crept back into my life yet again. You too can likely relate in some capacity, so what can we do to take back autonomy of our digital lives?
Recognizing the need for a healthier relationship with technology, over the last several months I've conducted an experiment with the intent of reducing the iPhone's functionality to be as minimal as possible. This time however, my aim was to retain the full access to information and connectivity that smartphones are essential for, but without the addictive stimulation. The idea here is to keep all the utility that makes the iPhone amazing but keep yourself in the driver seat.
To be completely honest, I've made countless mistakes in the process; trial by fire if you will. But in doing so I’ve arrived at a method that’s allowed me to largely regain control to the point where I'm ready to share what I've learned thus far. And don't worry, I'm not going to suggest that you download any paid apps, as everything in this guide is free. All that it asks of you is a small investment of time in order to set everything up.
Let me also preface this by saying that what I'm proposing is intended more as a general framework rather than a rigid system. Take what works for you personally and leave the rest.

Practical Steps
While as a society we've had access to the internet for roughly 30 years, the difference between then and now is that in the past you would at some point inevitably walk away from your computer. In contrast, a smartphone is always with you and it's all too easy to go down the rabbit hole of checking social media, YouTube, your business email after hours, etc, without it even being a conscious decision. So let's introduce some friction into our lives and leave the most compelling nature of technology to a standalone computer.
Convert Safari Browser To Reading Mode & Block Images
To start, we're going to delete all other web browsers except for Apple's native Safari app, with the end goal being to convert it into a distraction-free, text only experience.
- Once you've deleted any other existing web browsers you may have on your phone, go to Settings > Apps > Safari, and under Settings for Websites, go to Reader.
- Enable the Automatically Use Reader On All Websites setting. As an added bonus, doing this will prevent you from seeing any ads on all web pages that are compatible with reading mode (you're welcome).
- Now whenever you open an article style web page on Safari, a reading mode icon will appear in the top left hand corner adjacent to the website address bar. Clicking on the reading mode icon allows you to change the font, brightness level, or hide reading mode on that specific page entirely if desired. I'll often disable reading mode if I want to read a comments section at the bottom of an article.
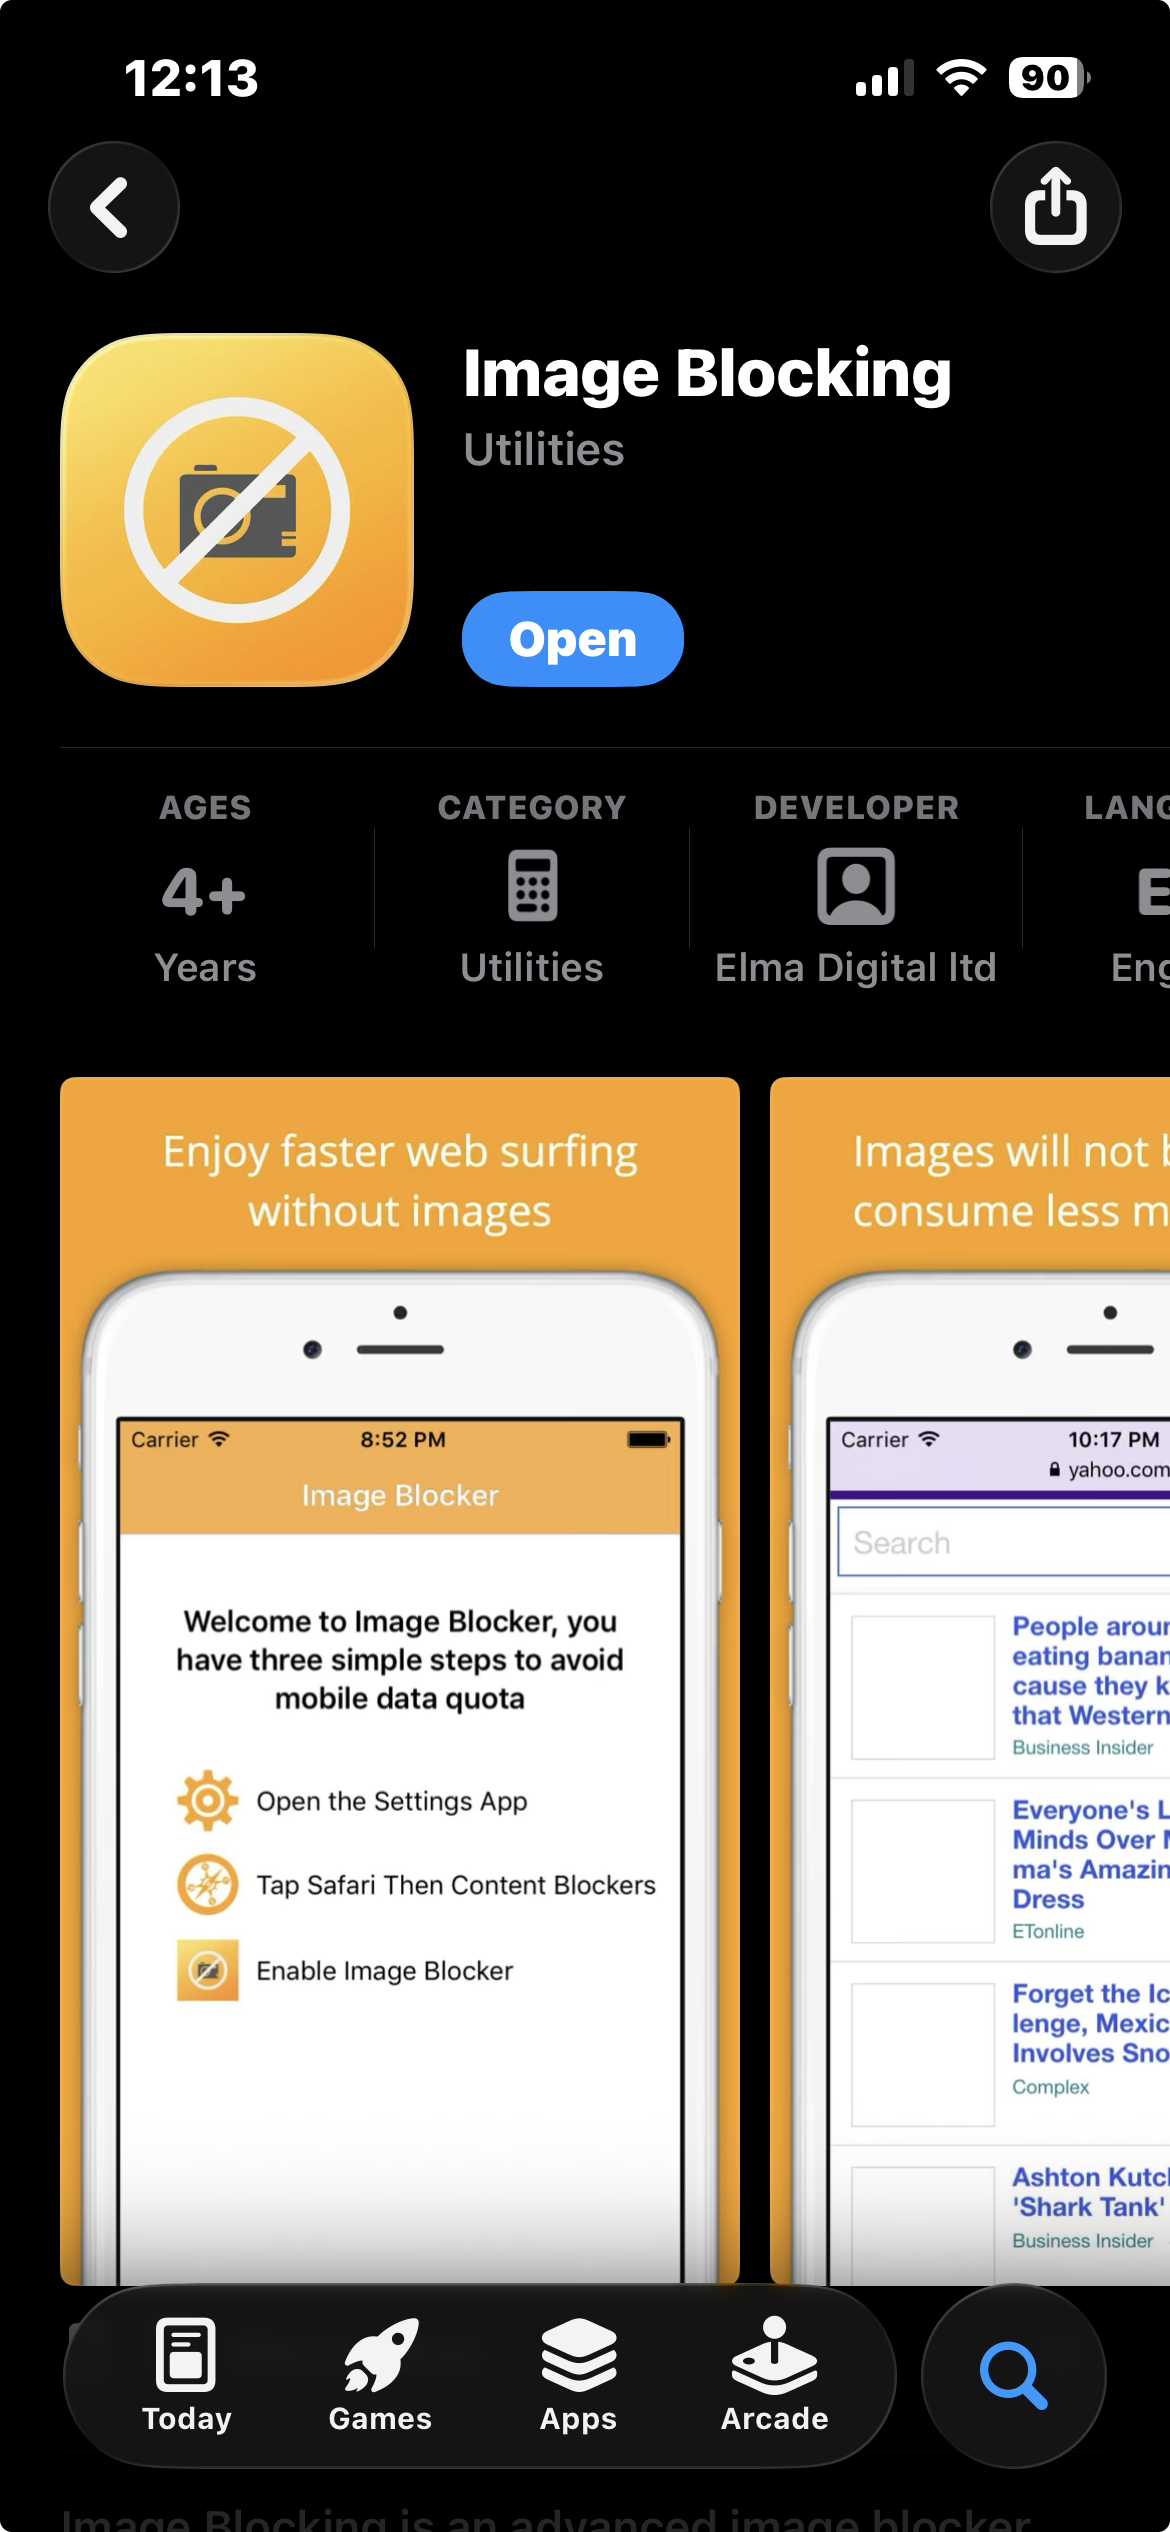
- From here, we're also going to block images from loading in Safari. To do this we'll download a free app called Image Blocking from the App Store:
In order to ensure this app works correctly, go to Settings > Screen Time > Content & Privacy Restrictions > App Store, Media, Web, & Games > Apps, and under the Age Rating option choose Unrated.
Disable App Store & Restrict Problematic Website Content
This phase is about decluttering your digital life by removing any and all apps that you know to be a distraction. This is going to be a personal choice, but an easy win to start with will include deleting all of your social media apps. Be sure to keep everything that's genuinely useful to you. For myself, I've chosen to keep banking, transit, dictionary, Wikipedia, maps, Google Keep, weather, and similar apps that aid me in my day-to-day life.
- In order to establish a firm boundary around app usage, go to Settings > Screen Time > Content & Privacy Restrictions and turn the top toggle on.
- Next, go to App Installations & Purchases and change the Installing Apps setting to Don't Allow.
- While still in the Content & Privacy Restrictions menu, go to App Store, Media Web, & Games > Web Content and change the setting to Limit Adult Websites.
- While still in the Web Content menu, I'd also recommend blacklisting any websites that you know to be personally problematic (such as social media sites) by adding them to the Never Allow list.
Set Up A Muted, Monochrome Display
Next up we're going to make the screen itself less appealing to use, again with the purpose of adding some much needed friction to the act of using our phones.
The iPhone's screen is by default, designed to be an enticing invitation to endless engagement, so we'll want to tone down its visual impact as much as possible.
- First, go to Settings > Accessibility > Motion, and enable the Reduce Motion setting.
- While still in the Accessibility menu, go to Display & Text Size. Enable Color Filters and choose the Grayscale setting.
- While still in the Display & Text Size menu, enable Reduce White Point. I like to keep mine set to 75% most of the time.
- For added legibility, you may choose to enable the Bold Text option which is also found under the Display & Text Size menu.
- Additionally, I've found that enabling Dark Mode makes the phone even less compelling to use, so if you'd like to set this up go to Settings > Display & Brightness > Appearance > Dark.
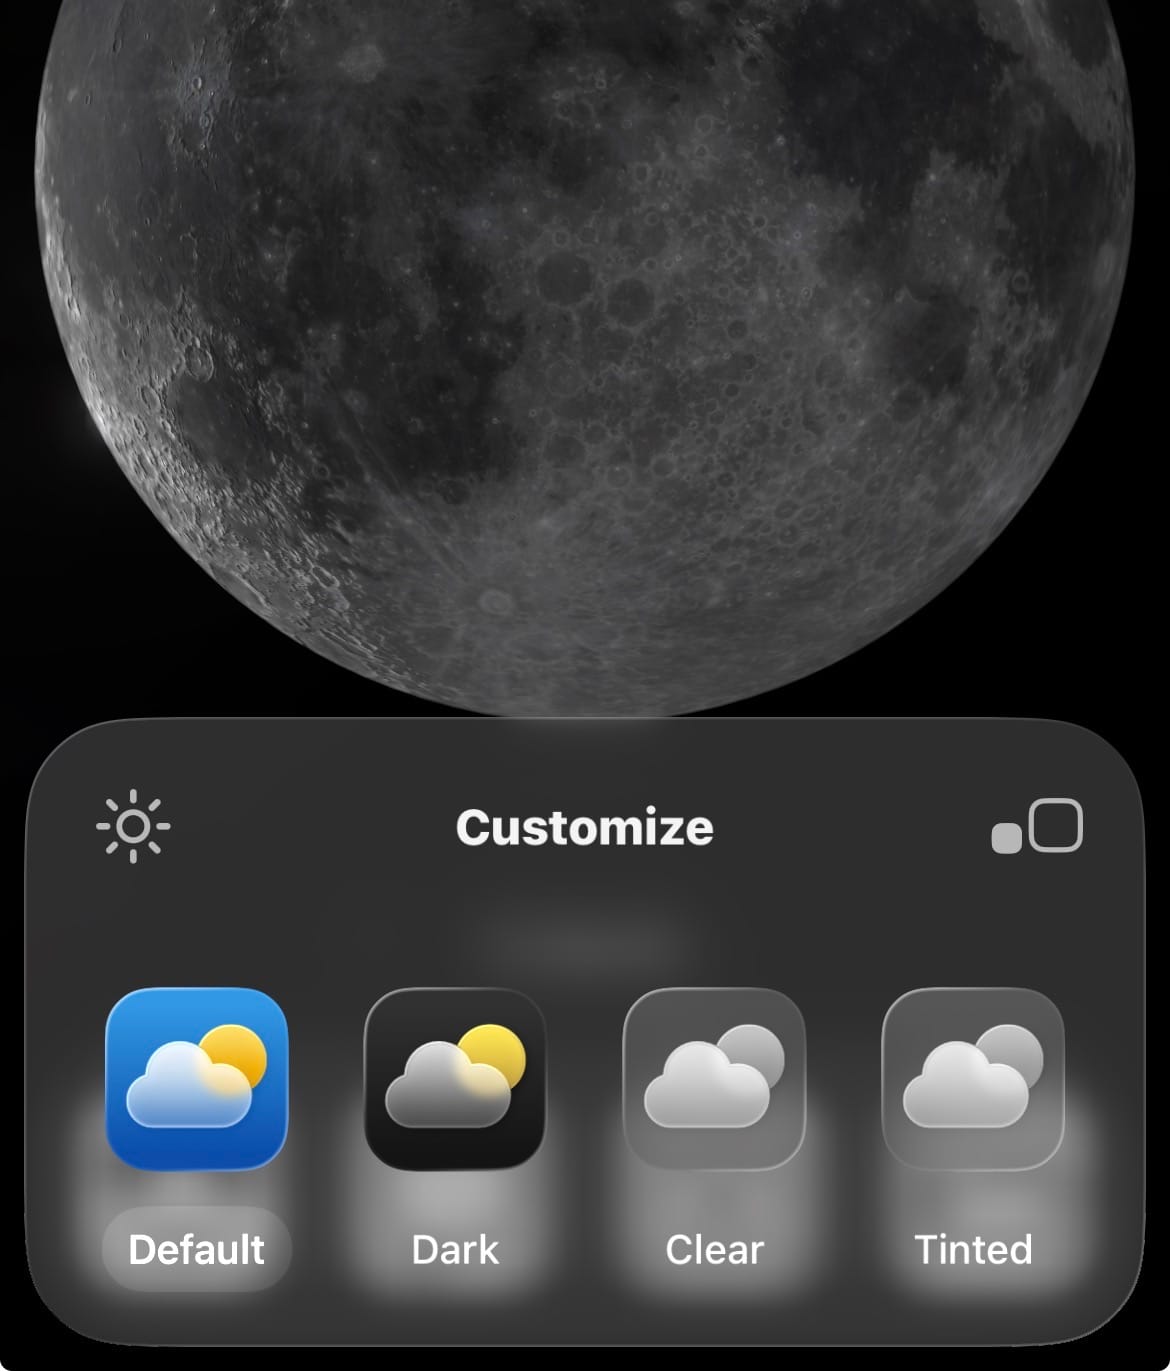
- Finally, be sure to choose a wallpaper that isn't eye-catching. To change your current wallpaper, go to Settings > Wallpaper > + Add New Wallpaper. I like the moon wallpaper because it's simple and elegant.
If after changing all of these settings you're finding that it's difficult to see the remaining apps on your phone, we can increase the legibility of the app icons using Apple's Shortcuts feature, which is how I achieved the layouts you see here:
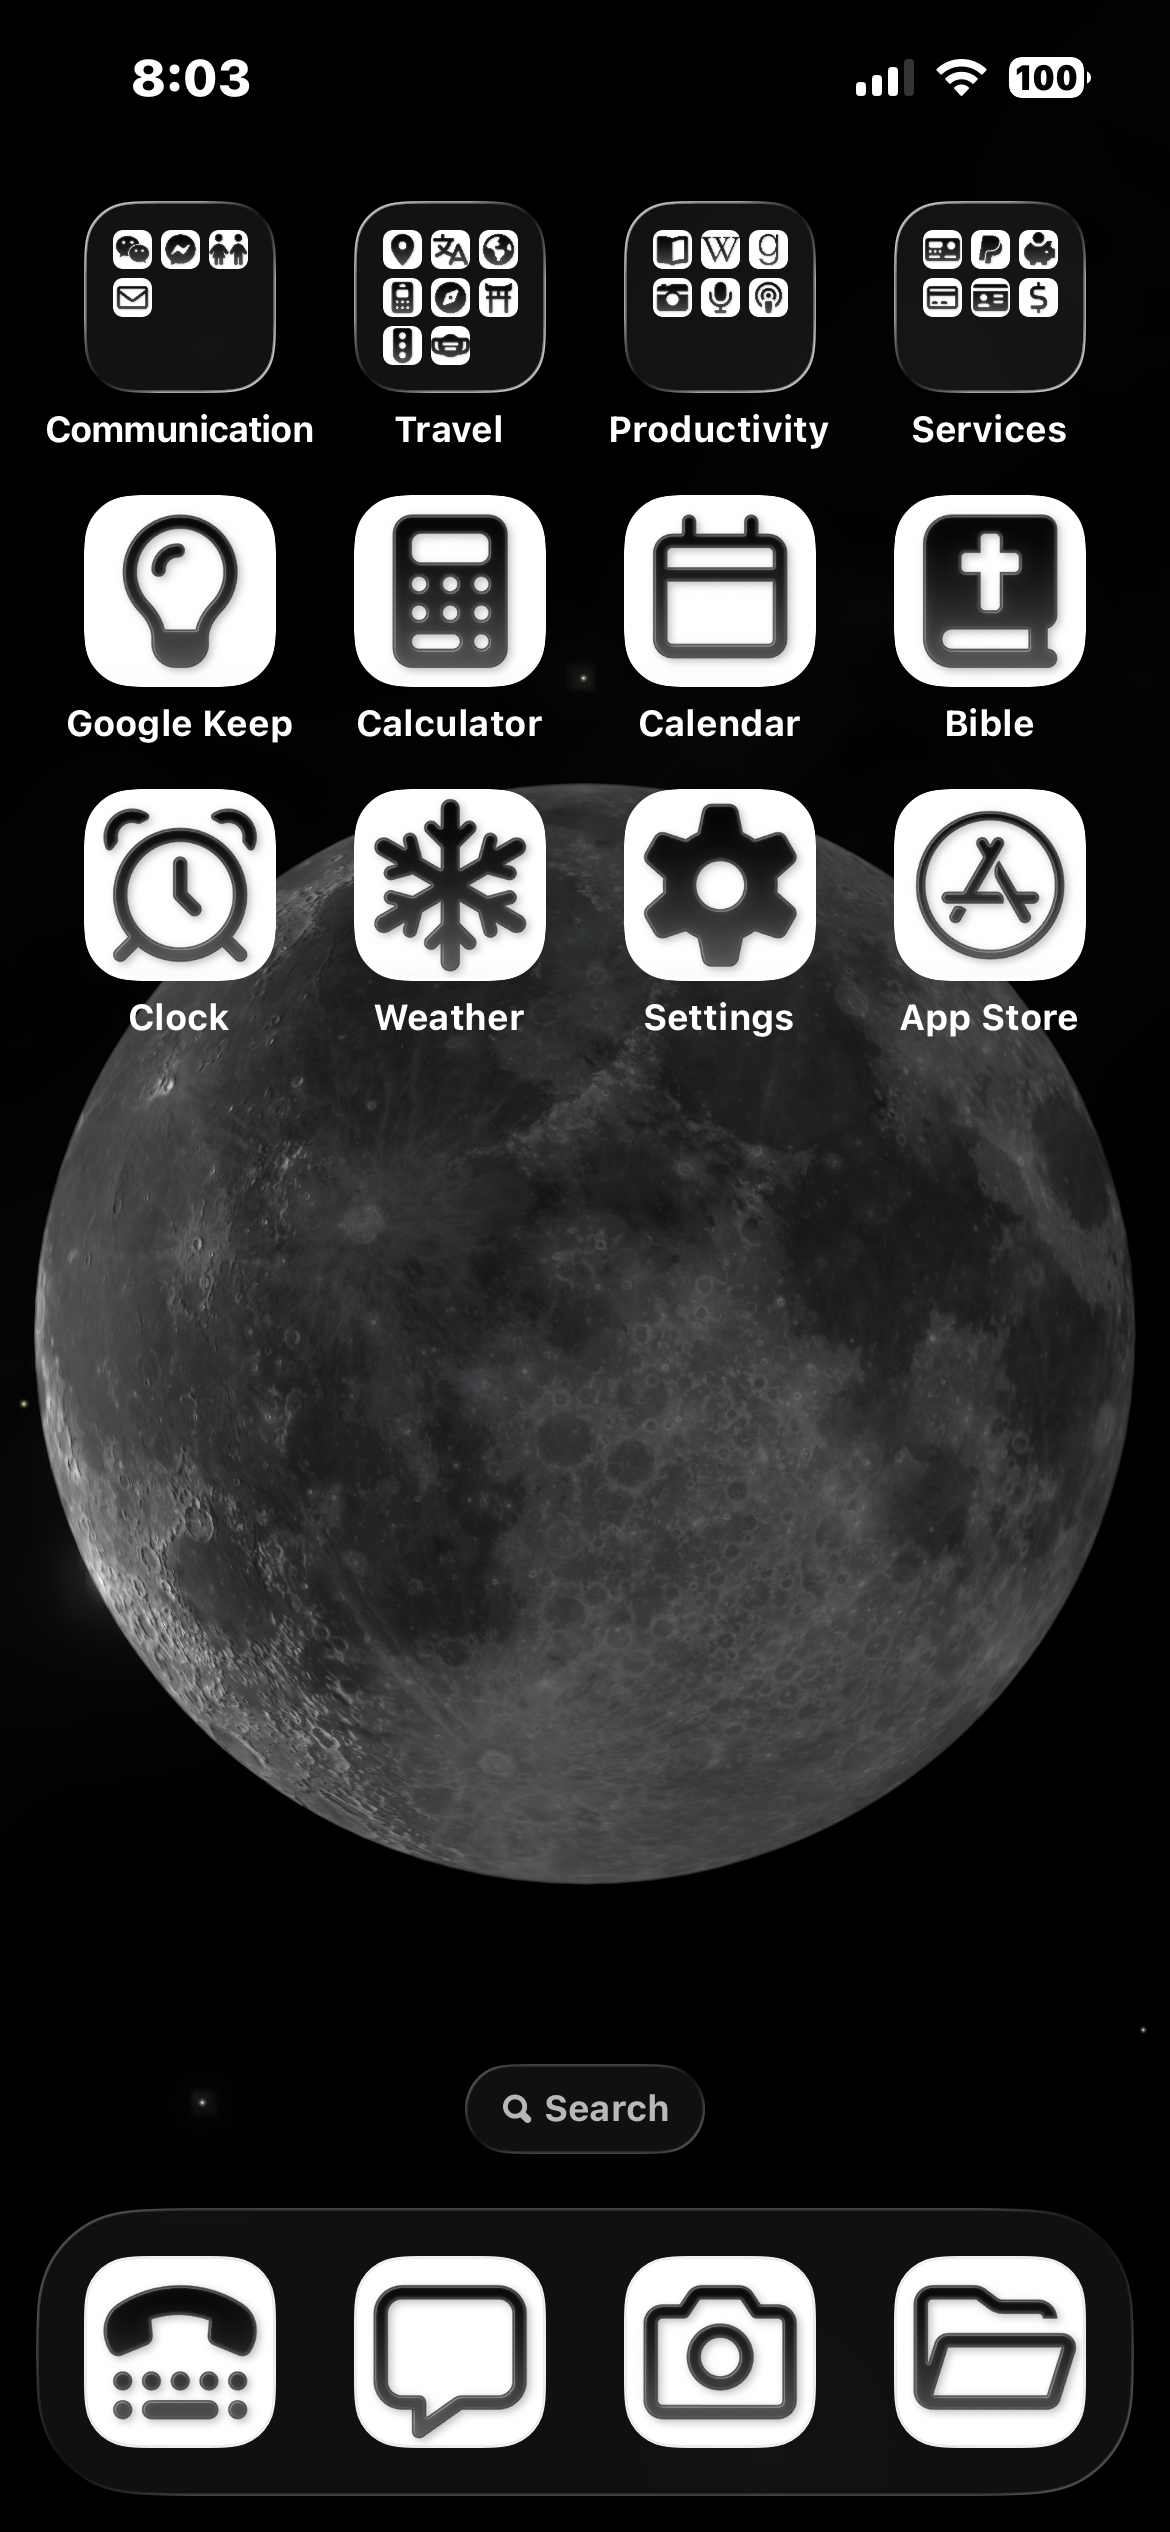
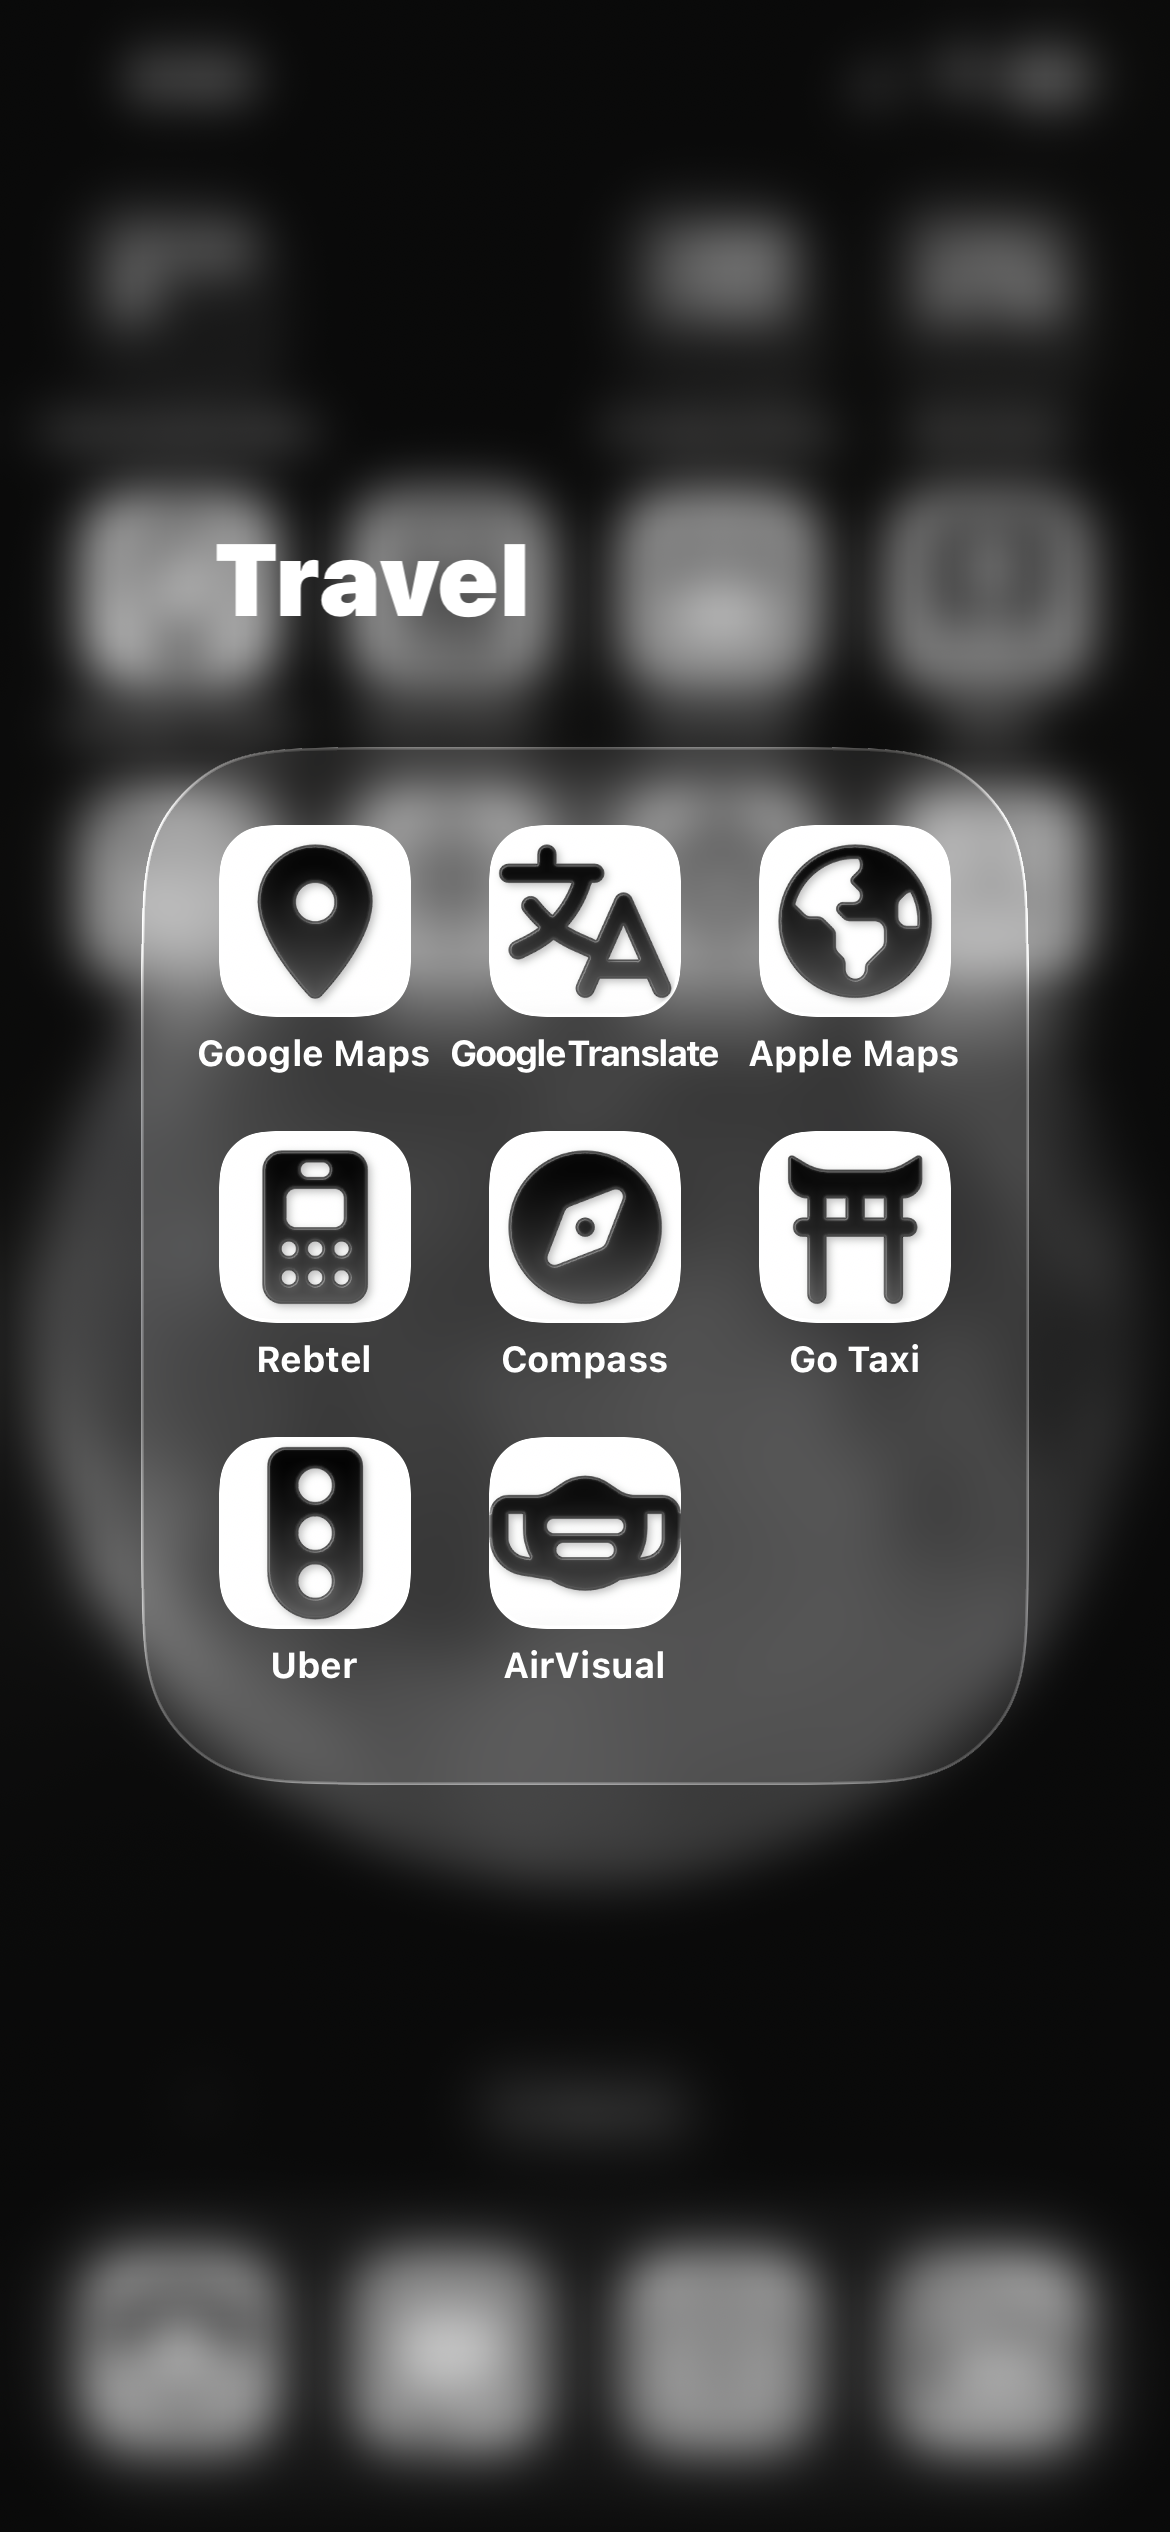
My current iPhone setup using Apple Shortcuts and free Font Awesome icons
Increase Legibility Of App Icons Using Shortcuts
If you'd like to simplify your home screen layout for a more minimal aesthetic as seen above, we can do this by using Apple's built-in Shortcuts app. This allows you to replace an app's standard icon on your home screen with a custom icon of your choosing. This is admittedly a bit annoying to set up, but thankfully once it's done you can set it and forget it.
- Open the Shortcuts app on your phone and click on the + icon to create a new shortcut.
- Tap New Shortcut and rename it to the app that this shortcut icon will be opening. For example, if this is going to replace your standard Calculator icon on your home screen, name this Shortcut "Calculator".
- On that same screen under Search Actions, select Open App.
- Choose the app that you'd like to open. To continue with my previous example, you could choose Calculator.
- Tap Open App again, and this time select Choose Icon. Scroll through Apple's exhaustive list of icons to find one that's going to be easily recognizable to you and select it.
- Tap Open App one more time and select Add to Home Screen. This will add the new custom icon to your home screen that will now open the app that you've chosen.
- You can then remove the original app icon from your home screen, but be sure that you don't delete the app itself in the process. Do this by long pressing on the original app icon and selecting Remove App. Be sure to choose Remove from Home Screen, we don't want to select the Delete App button.
Now, if at this point the home screen still isn't looking quite right you may need to change one more display setting, which is as follows:
- Long press on the home screen until the app icons start jiggling. Tap on the Edit button in the top left hand corner. Tap Customize and select from one of the following options to your liking:
Disclaimer: This Final Part Is Entirely Optional And A Lot Of Work
Lastly, if you really want to go for a minimalist vibe as I have with my app icons, and / or you just absolutely have to have an app's official logo, I'd recommend going to Font Awesome to download their free Classic or Brands icons on your desktop computer. Just note that this is going to take even more work, but for the perfectionists out there 🙋♂️ it might just be a required final step.
It's worth noting that Font Awesome icons are .svg files natively and will need to be first converted to Jpeg files before you send them to your phone. If you have access to Adobe Photoshop you can easily convert them there, otherwise you can use the free image editor Gimp to do the conversion. Once they've been converted to Jpegs on your computer, save them to your phone (I suggest AirDrop if you have a Mac).
Once they're on your phone go back to the Shortcuts app:
- Select the shortcut that you'd like to edit by tapping on the Three Dots next to each one.
- Tap on the name of the shortcut and select Add to Home Screen.
- Tap Image followed by either Choose Photo or Choose File, depending on where you've saved the Font Awesome Jpeg icons on your phone.
Again, there's no real reason to do this last part unless you're going for a very specific aesthetic to your home screen. I gave myself a headache by going all out on my app icon customization, so proceed with caution.
Conclusion
At some point, Apple will undoubtedly update the operating system that changes the specific steps of my advice here. Still, my hope is that you can use this guide as a general reference for settings that you can adjust going forward, even if the exact procedure to make those changes evolves over time.
As I've found in my own life, in order for this system to work effectively you need to be vigilant in maintaining a conscious effort not to revert your phone settings back to its former setup. You may go back and forth at times out of habit, and that's ok. Think of this as a long-term transition that may take weeks or even a couple of months to fully adjust to (as it did for me).
If there's any one thing you take away from all of this, remember that we're best served by keeping the most stimulating activities limited to a desktop computer; the device that you can definitively turn off and walk away from at the end of the day. Don't allow your access to apps and the internet be a frictionless, pocketable experience. Your mental health, focus, and productivity will thank you.